A Step-by-Step Guide to Finishing Drywall in a Garage
Finishing drywall in your garage can transform it from a simple storage space into a functional and attractive part of your home. Whether you want to create a workshop, a home gym, or simply a more organized area, properly installed and finished drywall is key. At Calgary Drywallers, we specialize in delivering high-quality drywall services to meet your needs. Here’s a step-by-step guide to finishing drywall in a garage.
Step 1: Preparing the Space
Before you begin, it’s important to prepare the garage space thoroughly:
Clear and Clean the Area
- Remove all items from the garage, including shelves, tools, and vehicles.
- Clean the walls and floor to ensure a dust-free environment, which will help the drywall adhesive and mud adhere better.
Inspect for Insulation and Electrical Work
- Ensure that the walls are properly insulated. This is crucial for energy efficiency and temperature regulation.
- Check that all electrical wiring, outlets, and fixtures are installed and up to code. Make any necessary adjustments before proceeding.
Step 2: Measuring and Cutting the Drywall
Measure the Walls and Ceiling
- Use a tape measure to get accurate measurements of the walls and ceiling. Measure twice to ensure precision.
Cut the Drywall Panels
- Use a utility knife to cut the drywall panels to the appropriate sizes. A straight edge will help you make clean, straight cuts.
Mark and Cut Openings
- Mark locations for electrical outlets, switches, and any other fixtures on the drywall panels.
- Use a drywall saw to cut out the marked sections.
Step 3: Installing the Drywall
Attach Drywall to the Ceiling First
- Begin by attaching drywall panels to the ceiling. This can be a two-person job, so having a helper is beneficial.
- Use drywall screws to secure the panels to the ceiling joists, spacing screws about 12 inches apart.
Secure Drywall to the Walls
- Starting from the top, attach the drywall panels to the wall studs using drywall screws. Ensure the panels fit snugly against each other to minimize gaps.
- Continue attaching panels down the wall, cutting and fitting pieces as necessary.
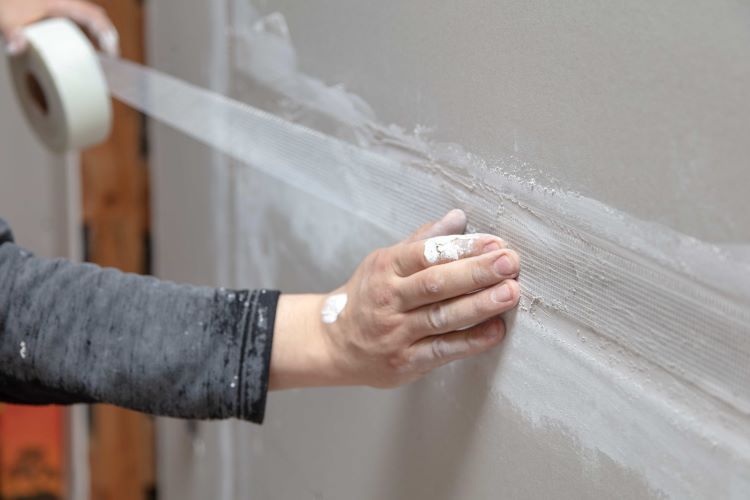
Step 4: Taping and Mudding
Apply Drywall Tape
- Cover all seams between drywall panels with drywall tape. Use a taping knife to press the tape firmly into place.
First Coat of Joint Compound (Mud)
- Apply a thin layer of joint compound over the taped seams and screw holes using a taping knife.
- Feather the edges of the compound to ensure a smooth transition between the drywall and the mud.
Let it Dry
- Allow the first coat of joint compound to dry completely. This typically takes about 24 hours.
Sand and Repeat
- Once dry, lightly sand the first coat to smooth out any imperfections.
- Apply a second coat of joint compound, feathering the edges again, and let it dry.
- Sand the second coat and apply a third, if necessary, for a perfectly smooth finish.
Step 5: Priming and Painting
Apply Primer
- After the final sanding, apply a coat of primer to the entire surface. Primer helps the paint adhere better and covers any imperfections.
Paint the Drywall
- Once the primer is dry, paint the walls and ceiling with your chosen color. Use high-quality interior paint for a durable, professional finish.
Step 6: Final Touches
Install Baseboards and Trim
- Reinstall or replace any baseboards and trim to complete the look of your finished garage.
Clean Up
- Remove any protective coverings and clean the area thoroughly.
Organize Your Space
- Return your items to the garage, organizing them neatly to maximize the newly finished space.
Conclusion
Finishing drywall in your garage can significantly enhance its functionality and appearance. By following these steps, you can achieve a professional-looking result that meets your specific needs. At Calgary Drywallers, we offer expert drywall services to help you complete your garage project efficiently and effectively. Contact us today to get started on transforming your garage into a beautiful, useful space.
You might also like