Mastering the Art of Drywall Patching

Is there a hole or dent in your drywall that's been bothering you? Don't worry – with the right tools and techniques, you can patch it up like a pro. In this step-by-step guide brought to you by Calgary Drywallers in Calgary, Alberta, we'll walk you through the process of patching a hole in drywall, along with the tools and materials you'll need to get the job done right.
Materials Needed:
- Drywall patch
- Joint compound (mud)
- Drywall tape (optional)
- Sandpaper (medium grit)
- Primer
- Paint
Tools Needed:
- Utility knife
- Putty knife
- Drywall saw or rotary tool with cutting bit
- Measuring tape
- Pencil
- Drywall screws or nails
- Drywall sanding block or sanding sponge
- Paintbrush or roller
Step 1: Prepare the Area
Start by removing any loose or damaged drywall around the hole using a utility knife or drywall saw. Clean the area to ensure there's no dust or debris that could affect the adhesion of the patch.
Step 2: Cut the Patch
Measure the dimensions of the hole and cut a piece of drywall patch slightly larger than the hole using a utility knife or drywall saw. Make sure the patch fits snugly into the hole without overlapping the surrounding drywall.
Step 3: Attach the Patch
If the hole is large or irregularly shaped, you may need to create a backing for the patch using scrap wood or drywall. Secure the backing behind the hole with drywall screws or nails, then attach the patch over the hole using drywall screws or adhesive.
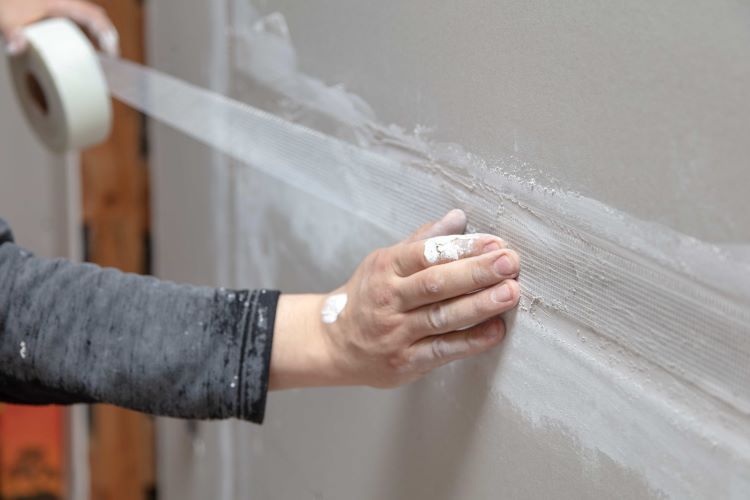
Step 4: Apply Joint Compound
Using a putty knife, apply a thin layer of joint compound (mud) over the patch, extending it slightly beyond the edges of the patch to blend with the surrounding drywall. If necessary, apply drywall tape over the seams before applying the joint compound for added reinforcement.
Step 5: Smooth and Feather the Edges
Once the joint compound is dry, use sandpaper or a sanding block to smooth and feather the edges of the patch, blending it seamlessly with the surrounding drywall. Be sure to remove any excess joint compound to achieve a smooth finish.
Step 6: Prime and Paint
After sanding, wipe away any dust with a damp cloth and allow the area to dry completely. Apply a coat of primer to the patched area to ensure proper adhesion of the paint, then paint the patch to match the surrounding wall.
Step 7: Finishing Touches
Once the paint is dry, inspect the patched area for any imperfections and touch up as needed. Congratulations – you've successfully patched a hole in your drywall!
Conclusion:
Patching a hole in drywall may seem daunting, but with the right tools and techniques, it's a straightforward DIY project that anyone can tackle. If you'd rather leave it to the professionals, Calgary Drywallers is here to help. Contact us today for expert drywall repair services and enjoy flawless results that will make your walls look as good as new.
You might also like